Friday, 28 June 2019

Loopback Adapter Installation on Windows Server 2012

Install Loopback Adapter

Microsoft’s loopback adapter can be installed to provide a virtual network connection and IP address. Here’s how you do it.
  • Logon to Windows Server 2012 as a local administrator.
  • Right-click the far bottom left of the Taskbar, over the Start charm when it appears, and select Device Manager from the menu.
  • In the Device Manager window, right-click the server name and select Add legacy hardware from the menu.
  • Click Next on the welcome screen of the Add Hardware Wizard.
  • Select Install the hardware that I manually select from a list (Advanced) and click Next.
  • Under Common hardware types, scroll down the menu, select Network adapters and click Next.
  • On the Select Network Adapter screen, select Microsoft from the list of manufacturers.
  • Select Microsoft KM-TEST Loopback Adapter from the list of network adapters on the right and click Next.
Loopback Adapter Installation
  • Click Next again to confirm that you want to install the loopback adapter.
  • Click Finish once the installation has completed.

Configure Loopback Adapter

Now that the loopback adapter is installed on the server, you can configure it via the Network and Sharing Center.
  • Right-click the network icon in the bottom right corner of the desktop Taskbar and select Open Network and Sharing Center from the menu.
  • In the Network and Sharing Center window, click Change adapter settings.
  • In the Network Connections window, right-click the Microsoft KM-Test Loopback Adapter and select Properties from the menu.
  • On the Networking tab, select Internet Protocol Version 4 (TCP/IPv4) and click Properties.
  • In the Properties dialog on the General tab, configure IP address network and DNS settings as required and click OK.
  • Close the adapter’s Properties dialog.

2. Using Diskpart

  1. Insert your USB flash drive (4Gb + preferable) into your system
Warning: All data on the USB flash drive will be lost, make sure you save any data before proceeding.
  1. Navigate to the Command Prompt. Select Start & type CMD in the search field, right click on CMD.exe and select Run as administrator
    Alternatively, navigate to Start > All programs > Accessories > right click on Command Prompt and select Run as administrator
Elevated Command Prompt
  1. A User Account Control (UAC) dialog Window may appear. Click Yes to Continue.
  2. When the Command Prompt opens, enter the following commands followed by Enter
  3. DISKPART - This will start the utility
  4. LIST DISK - This will show the disk number of your USB flash drive. In the image below the USB flash drive shows as Disk 2.
DiskPart
  1. SELECT DISK X (Replace X with your USB flash drive number, we are using 2 in this example)
  2. CLEAN - This wipes the drive
  3. CREATE PARTITION PRIMARY- Creates partition
  4. SELECT PARTITION 1- Selects partition 1
  5. ACTIVE- Marks the current partition as active
  6. FORMAT FS=NTFS QUICK - This formats the partition
  7. ASSIGN- Assigns a drive letter.
  8. EXIT
Insert your Windows DVD into the optical drive.
From the command prompt, enter the following:
g: <enter> (Where "g" is your DVD drive letter)
cd boot <enter> (changes to boot directory)
G:\boot bootsect /nt60 d: <enter> (Where "d" is your USB drive letter)
Copy all files from the Windows CD to the USB flash drive using xcopy
cd\ <enter>
G:\xcopy g:\*.* /s/h/f f:\ <enter>
This will copy the Windows installation files onto the USB flash drive, it may take several minutes.
xcopy switches are as follows:

/s - Copies directories and subdirectories except empty ones.
/h - Copies hidden and system files.
/f - Displays full source and destination filenames while copying.

To display the full list of switches, type xcopy /? <enter>
This will make the USB drive bootable and when selected at start up, will boot straight into the Windows installation.

How To Remote Desktop From a Mac to a Windows Computer

1. First you need to make sure you have incoming remote desktop connections enabled on the Windows PC. Click Start then right-click on Computer and select Properties.
sshot-2011-03-01-[01-09-02]
2. Then click on the Advanced system settings hyperlink.
sshot-2011-03-01-[01-10-03]
3. In System Properties click the Remote tab, under Remote Desktop click Allow connections from computers running any version of Remote Desktop, then click OK.
sshot-2011-03-01-[01-10-43]
4. Now on your Mac computer download and install Microsoft Remote Desktop Connection Client for Mac.
sshot-2011-03-01-[01-45-25]
5. Installation is easy…just accept the defaults following the wizard.
sshot-2011-03-01-[15-05-08]
6. Close out of the installer and click Finder from the dock.
sshot-2011-03-01-[17-15-05]
7. Then you’ll find the Remote Desktop Connection utility in Applications. If you find that you’re using it a lot, you might want to add it to The Dock for easier access.
sshot-2011-03-01-[17-15-44]
8. Launch Remote Desktop Connection for Mac and enter in the computer name or IP Address of the machine you want to connect to. In my tests, entering in the IP Address worked the best.
sshot-2011-03-01-[15-06-18]
9. Next you’re prompted to enter in your user name and password of the Windows PC, then click OK. You might also want to check Add user information to your keychain so you don’t have to enter it in every time you want to connect.
sshot-2011-03-01-[15-06-42]
10. There you go! Now you have access to your Windows PC from your Mac just like you were sitting in front of it.
sshot-2011-03-01-[15-07-12]
sshot-2011-03-01-[15-08-54]
11. Here is an example of accessing an XP Pro computer from a Mac on a Home Network.
sshot-2011-03-01-[18-19-03]
12. If you have a Windows Home Server on your network, you can remote into it from your Mac too.
sshot-2011-03-01-[18-30-07]
13. Usually when you remote into another computer, you don’t need to have all of the extra “eye candy” associated with the remote OS. Go into RDC Display settings and uncheck unneeded display features…this should help speed up the remote connection as well.
sshot-2011-03-01-[15-07-40]
14. Remote Desktop Connection for Mac has most if not all features that Windows users are familiar with when doing an RDP session into another Windows machine.
sshot-2011-03-01-[18-33-03]

Add a Network Printer

First, let’s add the Printer to the Server.
From Start, choose Control Panel.
1
Inside Control Panel, go to View Devices and Printers.
2
Chose to Add a Printer.
3
Assuming your printer is not found, go to ‘The Printer i want was not listed’
5
Next, chose ‘Add Local or network printer as Administrator’
The scan should run again, and then you can chose, ‘Printer not listed’
6
5
The printer i am adding is connected to the network, so i am choosing to ‘Add a printer using TCP/IP address..
7
Type in the IP Address of the printer.
8
Windows will attempt to connect to the printer and find a driver…
9
You can chose to share the printer at this point, but i would change that to No for the time being.
10
Once that is installed, you will be back to the Devices and Printers window. Select your Printer and choose ‘Print Server Properties’ at the top of the window.
4
Switch to the Drivers tab, and you can see all the available drivers your server has for printers.
11
This is where we will add our x86 (32bit) Printer Driver. You will need to download that from your manufacturer. For this printer, and my Windows 7 x86 clients i have downloaded the HP Universal Printer Driver.
I have downloaded BOTH the x64 and x86 version, and Extracted the files to a folder.
Click on Change Driver Settings, then Add. The Add Driver Wizard will start.
13
First we chose the Architecture that the Driver is for, in this case it is the x64 driver we want.
14
Next you chose the Driver files. I will click on Have Disk, and browse the to the x64 universal print driver folder.
15
17
I can then chose which version of the driver to load from the folder, i don’t honestly know the difference, so i chose the top one.
19
Then you can finish the wizard.
20
You can then repeat this process, but chose the x86 driver, and then chose the x86 Universal Print Driver folder.
22
At this point we have now installed 2 additional print drivers.You can see those listed.
26
Now, we need to change the driver that Windows uses for the printer we installed. Currently if we shared the printer AS IS, x86 clients would search for a 32bit equivalent driver for the HP Laserjet 3055, which it will not find.
In Devices and Printers, double click your printer, and then go to Customise.
27
On the Advanced Page, you can use the Drop Down menu to select a different Driver. You will see the Universal Print Driver listed.
2829
At this point we can now Share the printer. You can chose the Share name, and check the box to list the printer in the directory.
31
At this point, we have installed a printer, installed the drivers so it is available to x64 and x86 clients, and shared it to make it available to network users. You are now free to deploy the printer using your favourite method, either using Group Policy Preferences, or just having your users manually installing it.
Hope you find this useful.

Step by Step : Install & Configure Printer Pool in Windows Server 2012 R2

What Is Printer Pooling?
Printer pooling combines multiple physical printers into a single logical unit.
To client computers, the printer pool appears to be a single printer.
When jobs are submitted to the printer pool, any available printer in the printer pool can process them.
Printer pooling increases the scalability and availability of network printing.
If one printer in the pool is unavailable (for example, from a large print job, a paper jam, or being offline), all jobs are distributed to the remaining printers.
If a printer pool does not have sufficient capacity, you can add another printer to the printer pool without performing any client configuration.
You create a printer pool on a server by specifying multiple ports for a printer.
Each port is the location of one physical printer.
In most cases, the ports are an IP address on the network, instead of a local LPT or USB connection.

What Is Branch Office Direct Printing?
Branch Office Direct Printing reduces network costs for organizations that have centralized their Windows Server roles.
When you enable Branch Office Direct Printing, Windows clients obtain printer information from the print server, but send the print jobs directly to the printer.
The print data does not travel to the central server and then back to the branch office printer.
This arrangement reduces traffic between the client computer, the print server, and the branch office printer, and results in increased network efficiency.
Now lets go through how you as a Server Administrator can install & configure printer pool in windows Server 2012 R2 for your infrastructure…
For this demo, i will be using my OSI-SVR01 member server to install & configure Printer
1 – Our 1st step is to install the Print and Document Services server role in OSI-SVR01 server
In OSI-SVR01 server, in the Server Manager, click Add Roles & Features, then click Next 3 times…
on the Select Server roles interface, click Print and Document Services and then click Next
1
2 – On the Select Features interface, click Next
2
3 – On the Print and Document Services interface, click Next
3
4 – On the Select role services interface, in the Role services verify that Print Servercheck box is selected and then click Next
4
5 – in the Confirm Installation Selections interface, click Install
5
6 – On the Installation progress interface, click close
6
7 – Now lets install the Printer
On OSI-SVR01 server, in the Server Manager, click Tools, and then click Print Management
7
8 – Expand Print Servers, expand SVR01 (local), right-click SVR01 and then click Add Printer
8
9 – On the Network Printer Installation Wizard interface, click Add a TCP/IP or Web Services Printer by IP address or hostname, and then click Next
9
10 – On the Printer Address interface, change the Type of Device to TCP/IP Device, next in Host name or IP address, type 172.16.0.110clear Auto detect the printer driver to use, and then click Next
*** 172.16.0.110 is just to simulate Network Printer IP Address…
10
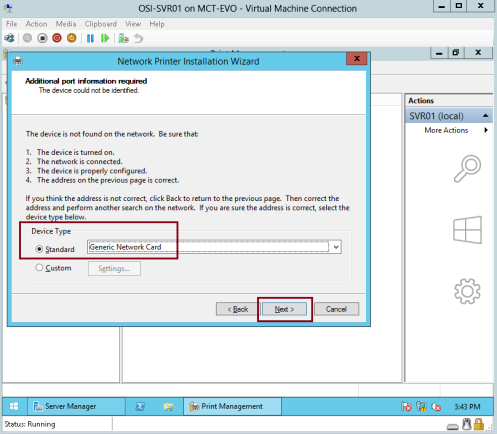
11 – Under Device Type, click Generic Network Card, and then click Next…
11
12 – On the Printer Driver interface, click Install a new driver, and then click Next
12
13 – On the Printer Installation interface, under Manufacturer, click Microsoft, under Printers, click Microsoft XPS Class Driver, and then click Next
*** I choose Microsoft XPS Class Driver just to simulate the printer installation, in real production you should choose your own Printer…
13
14 – On the Printer Name and Sharing Settings interface, change the Printer Name to OSI Finance Printer, and then click Next
14
15 – Click Next 2 times to accept the default printer name and share name, and to install the printer…
15
16 – Click Finish to close the Network Printer Installation Wizard…
16
17 – In the Print Management console, right-click the OSI Finance Printer, and then click Enable Branch Office Direct Printing
17
18 – right-click the OSI Finance Printer, and then select Properties
18
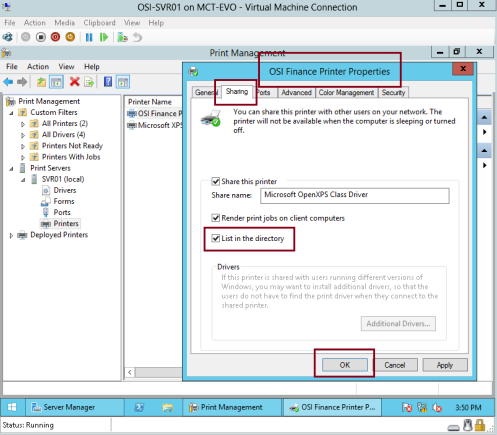
19 – On the OSI Finance Printer properties, click the Sharing tab, select List in the directory, and then click OK
19
20 – Next, lets configure printer pooling, in the Print Management console, under SVRo1, right-click Ports, and then click Add Port
20
21 – In the Printer Ports dialog box, click Standard TCP/IP Port, and then click New Port
21
22 – In the Add Standard TCP/IP Printer Port Wizard, click Next
22
23 – On the Add port interface, in Printer Name or IP Address, type 172.16.0.111, and then click Next
23
24 – In the Additional port information required dialog box, click Next
24
25 – Click Finish to close the Add Standard TCP/IP Printer Port Wizard…
25
26 – Click Close to close the Printer Ports dialog box…
26
27 – In the Print Management console, right-click OSI Finance Printer, and then click Properties
27
28 – In the OSI Finance Printer Properties dialog box, click the Ports tab, select Enable printer pooling, and then click the 172.16.0.111 port to select it as the second port…
28
29 – switch to your client PC, open Control Panel, then click Devices and Printers…
29
30 – In the Devices and Printers console, click Add a printer…
30
31 – On the Add printer interface, under searching for available printers, click your existing Printer name and then click Next…
31
32 – the wizard will install the printer driver from the OSI-SVR01 server…
32

33 – On the Add printer interface (it will stated that “You’ve successfully adddedd OSI Finance Printer on SVR01”), click Next…
33

34 – click Finish…
34
35 – verify that you have OSI Finance Pinter on SVR01 is listed in your Devices and Printers control panel…
35