Friday, 28 June 2019

Add a FTP site to your Windows favorites

Adding a FTP site to Windows favorites
Using the steps below I’ll show you how to make your FTP account very simple to access by using Windows Explorer in Windows 7.
For this example I’m using a dummy domain called example.com with a FTP user of example and a password of qwerty123
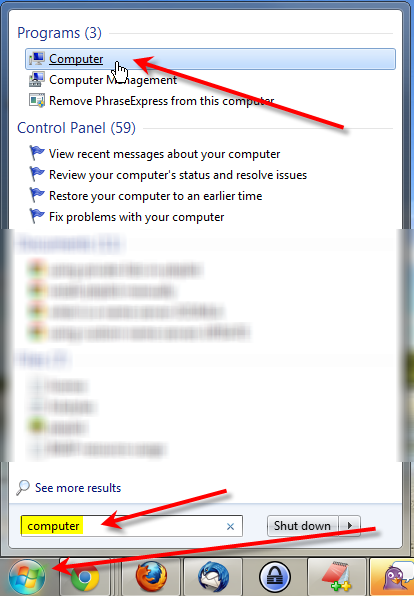
  1. click on start type in computer and click on computer
    Click on the Start button, type in computer in the Search programs and files box, then click on Computer.
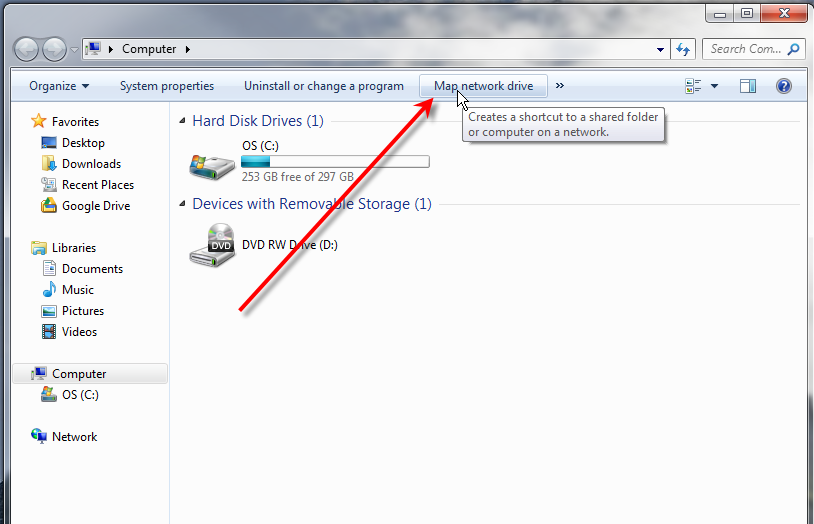
  2. click map network drive
    Next click on Map network drive at the top.
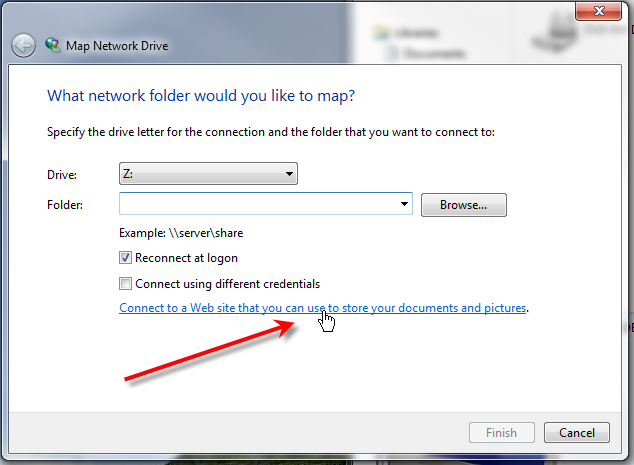
  3. click on connect to a web site
    Then click on Connect to a Web site that you can use to store your documents and pictures.
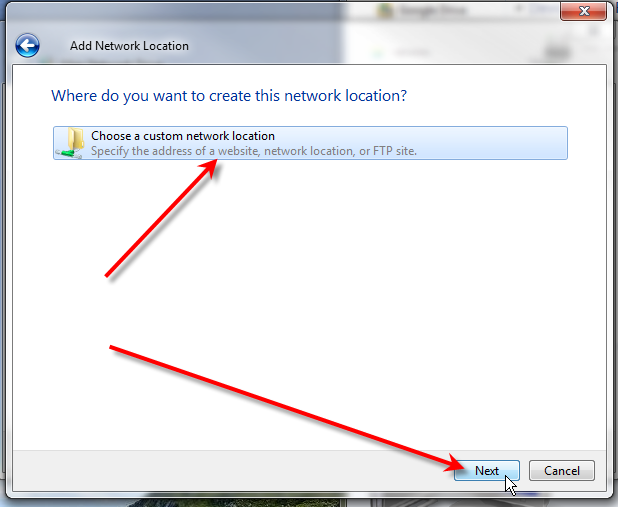
  4. On the Welcome to the Add Network Location Wizard page, simply click Next.
  5. click choose a custom network location click next
    Now click on Choose a custom network location, then click on Next.
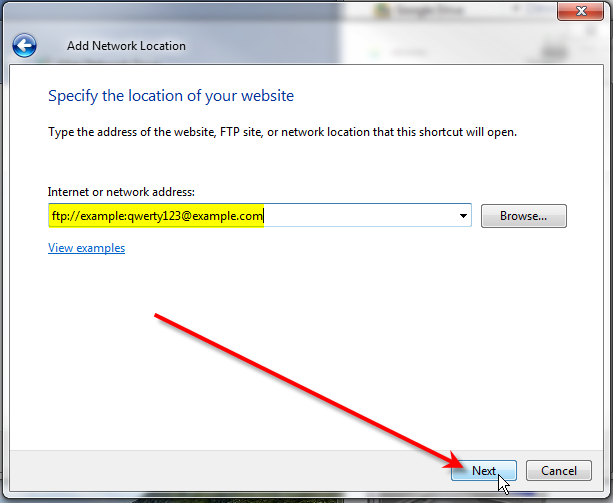
  6. type in ftp address then click next
    Under the Internet or network address field type in your full FTP path including username and password if you would like to not be prompted each time for this information.

    In this example I’ve used the following network address:
    ftp://example:qwerty123@example.com
    The address should be in the format of ftp://username:password@example.com
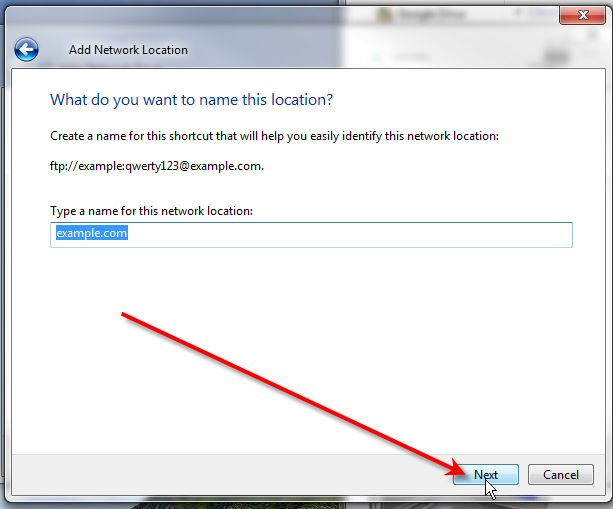
  7. name ftp location click on next
    Give a name for this FTP connection, then click on Next.
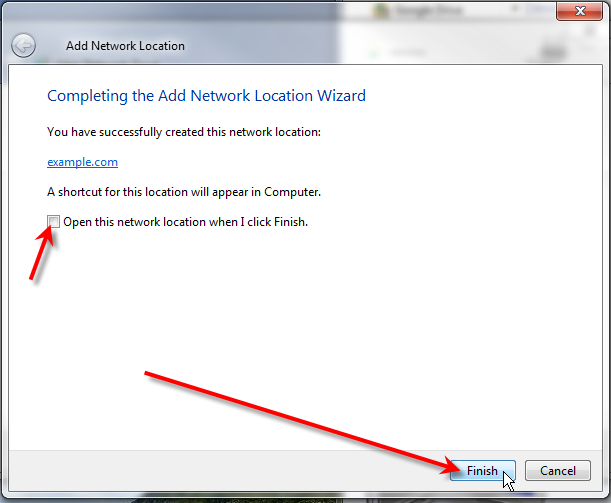
  8. un check open this network click finish
    In this case, go ahead and un-check Open this network location when I click Finish, then click on Finish.
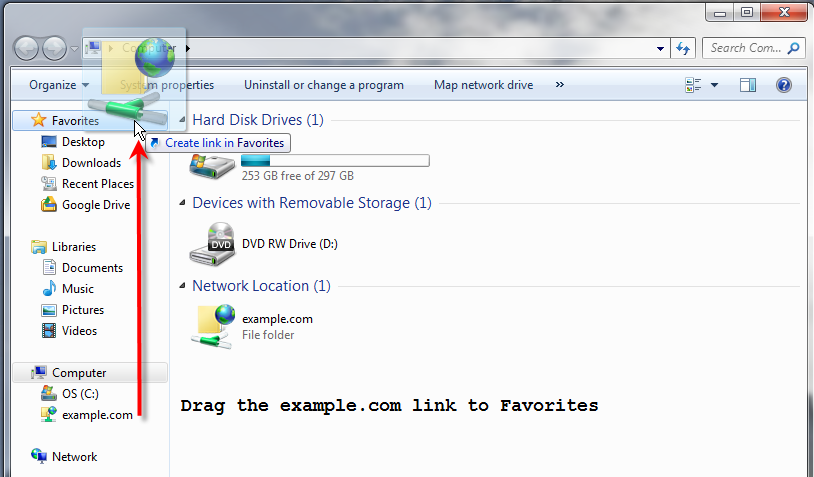
  9. drag ftp link to favorites
    Now you should see your FTP site below the Computer section, go ahead and drag it up to your Favorites to create a shortcut.
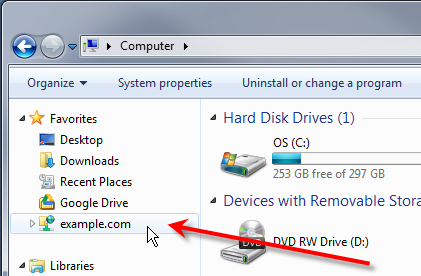
  10. click on ftp favorite link
    Now go ahead and click on your FTP site under your Favorites.
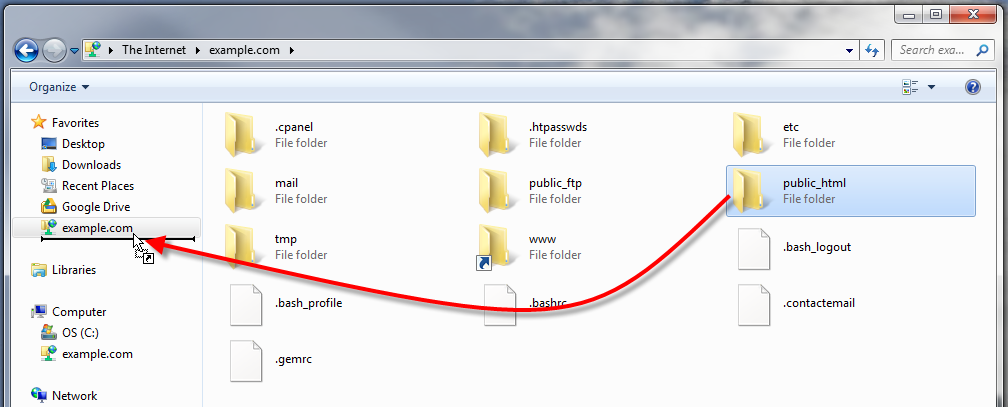
  11. drag public html to favorites
    At this point I’d recommend dragging your public_html directory under the first favorite we created. That way you have quick access to your full account, but can also just directly drag files to your public_html directory to have them display on your website.
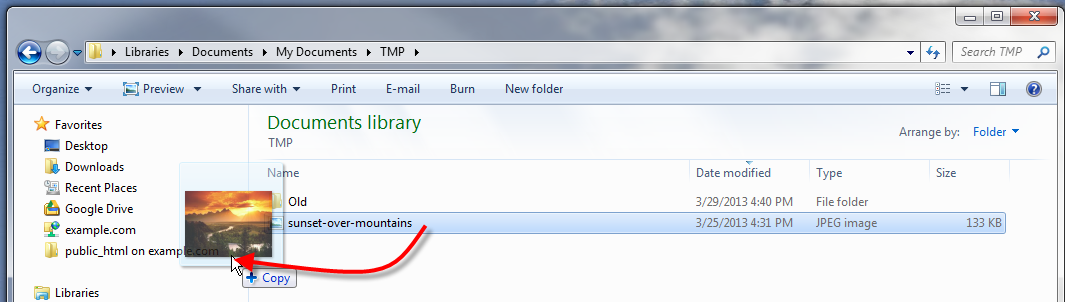
  12. drag file to public html
    Here you can see I’m dragging an image file sunset-over-mountains.png into my public_html on example.com shortcut.
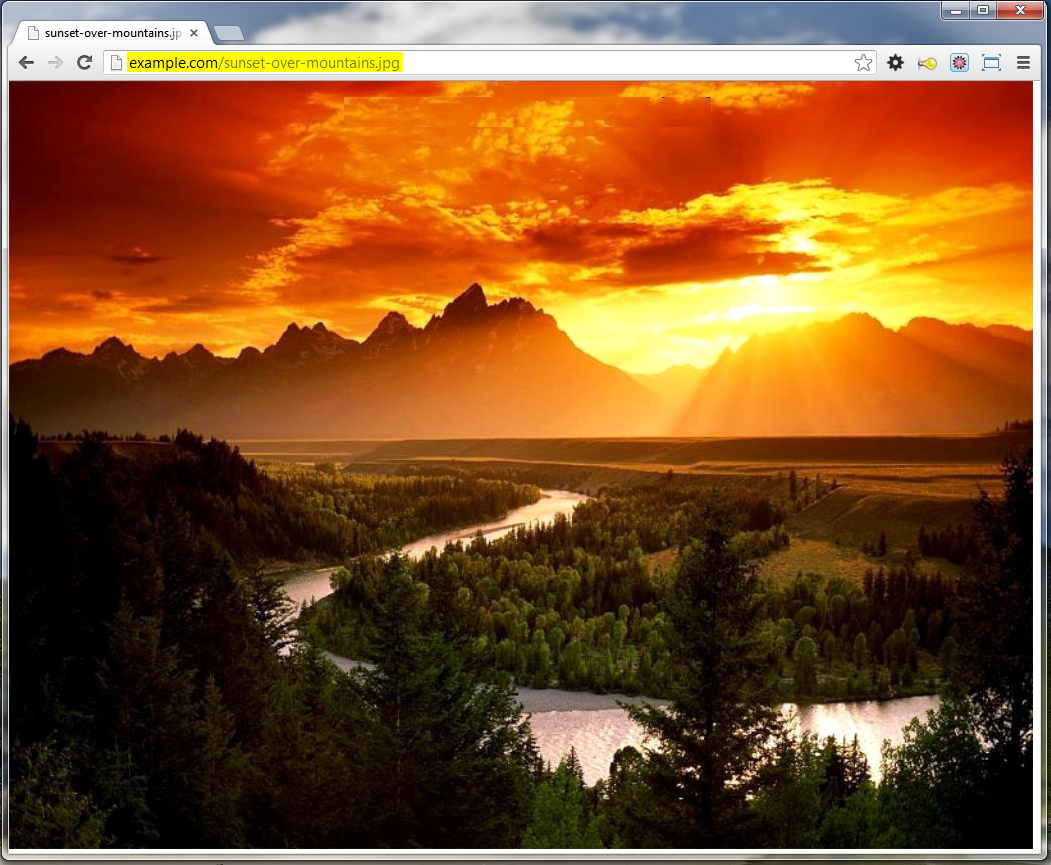
  13. view uploaded image in browser
    Because I uploaded the image to my public_html image, I can go ahead and pull it up in my web-browser now with success.

You should now understand how you can use the built-in Windows favorites links to quickly access your account via FTP.
  1. Enable Multiple RDP Sessions
  2. Log into the server using Remote Desktop.
  3. Open the start screen (press the Windows key) and type gpedit.msc and open it
  4. Go to Computer Configuration > Administrative Templates > Windows Components > Remote Desktop Services > Remote Desktop Session Host > Connections.
  5. Set Restrict Remote Desktop Services user to a single Remote Desktop Services session to Disabled.
  6. Double click Limit number of connections and set the RD Maximum Connections allowed to 999999.
Screenshot describing solution

Enable Task Manager disabled by Administrator or Virus in Windows

Windows Task Manager is used to view details about processes running on your computer. Since it can be used to terminate programs that are misbehaving or are viruses disguised in the form of harmless programs, most spyware and viruses disable it to prevent themselves from being closed through it. Some administrators also disable Task Manager to prevent users from closing important security programs like antiviruses and anti-malwares.

In such situations, running the Task Manager will give the "Task Manager has been disabled by Administrator" error. However, there are some techniques you can use to re-enable task manager and close those harmful programs manually. This article contains few such simple techniques you can use to regain access to Task Managing privileges.

enable task manager disabled by administrator

Enable Task Manager from Registry in Windows 10, Windows 8, 7, or XP

Registry Editor is an inbuilt Windows tool that is used to modify registry keys which tell Windows how it should work. A simple registry modification can be used to bypass the Task Manager block. To do so, just follow the steps:-
  1. Click on Start. Go to Run. Alternatively, use Windows key+R keyboard shortcut.
  2. Type regedit and press Enter. Registry Editor will start. If Registry Editor is also disabled, you will first need to enable registry editing.
  3. Through the left hand navigation pane, navigate to HKEY_CURRENT_USER\Software\Microsoft\ Windows\ Current Version\Policies\System. If the System key is not there, you will need to create it.
  4. In the work area, locate "DisableTaskMgr". If this value is not there, you will need to create a new DWORD value called DisableTaskMgr. Double click on it. A window will pop up.
  5. Enter its value data as 0 and press OK.
  6. Close Registry Editor. If Task Manager is still disabled, restart your computer.

Enable Task Manager from the Group Policy Editor (Gpedit.msc)

enable task manager
Windows Task Manager in Windows 7
Group Policy Editor is a feature in Windows which is used to edit local policy settings. It can also be used to enable Task Manager. To do so, just follow the steps given below:-
  1. Open Start Menu. Windows XP users click on Run. Windows 10, Windows 8.1, Windows 8, Windows 7 and Vista users, go to Search. Alternatively, press Windows key+R.
  2. Type gpedit.msc and press Enter. Group Policy Editor Window will show up.
  3. From the navigational pane at the left hand side, go to: User Configuration>Administrative Templates>System>Ctrl+Alt+Del Options.
  4. In the work area, double click on "Remove Task Manager" and set its value to Disabled or Not Configured.
  5. Restart your Computer or Log Off and Log back On to apply the changes.
Group Policy Editor is not available on home editions of Windows.

Enable Task Manager by Running a CMD Command

Command Prompt can also be used to directly enable Task Manager.
  1. Open Notepad.
  2. Copy the code given below and paste it.
  3. REG add HKCU\Software\Microsoft\Windows\CurrentVersion\Policies\System  /v  DisableTaskMgr  /t REG_DWORD  /d /0 /f
  4. Save the File as TaskManager.bat.
  5. Run TaskManager.bat as Administrator if you use Windows 10, Windows 8, Windows 7 or Windows Vista. In Windows XP, simply open the file. A command prompt window will flash for a second and then disappear indicating successful execution. After running the batch file, you will be able to again use Task Manager. If Task Manager is still not available, restart your computer.

Create a Registry(.reg) file for enabling Task Manager

If you are unfamiliar with manually editing the Registry, you can create a Registry file which will automatically modify the Registry Key to re-enable Task Managing. To create one such file:-
  1. Open Notepad or any other text editor.
  2. Copy the code given below and paste it as it is in it.
  3. Windows Registry Editor Version 5.00 [HKEY_CURRENT_USER\Software\Microsoft\Windows\CurrentVersion\Policies\System] “DisableTaskMgr” =dword:00000000
  4. Save the file as Enable Task Manager.reg or *.reg.
  5. Open the file by double clicking on it.
  6. Registry Editor will ask you for confirmation. In the confirmation Window, click Yes.
  7. Task Manager would immediately be accessible. If it is not, restart your computer.

Friday, 4 March 2016


Step by Step guide to setup Active Directory on Windows Server 2008

This tutorial will explain how to install AD on server 2008. This will valid for windows 2008 R2 as well.
Requirement:
Minimum: Single processor with 1.4 GHz (x64 processor) or 1.3GHz (Dual Core)
Minimum: 512 MB RAM
Minimum: 32 GB or greater
  • The first step is to assign a ip to the server that you going to deploy the AD. Its nessary to install it as DNS server too. So its better to have fixed ip it doesn't mean you cannot install AD without fixed ip address but it will solve lot of issues if you used fixed ip.

In here the server ip is 10.0.0.14. Since we going to make it as DNS server too you should use the same ip as the preferred DNS server.
  • Next step is to install the Active directory roles. Unlikely the older version of windows servers Microsoft highly recommend to use server manager option to install roles before you run dcpromo.

  • Click on start menu and select the Server Manager

  • Select the roles from the right hand panel and click on add roles option.

  • From the roles list select the "Active Directory Domain Services" role and Click "Next"

  • Review the confirmation and click on "Next"

  • Review the installation confirmation and click on "Next"

  • It will take few minutes to complete and when its done you will get this confirmation. And then click on "Close"

After that you will need to do a reboot.
  • After reboot please open up the "server Manager" again. And then click on "Roles" there you will see the "Active Directory Domain Services" is successfully installed in there. click on it then you will get a window like below.


    In their please pay attention to the message


    So please click on that link and it will start the DCPROMO wizard.

  • So next step to go through the DC promo wizard.
  • To start the installation click on "Next"

  • Click on "Next"

  • Since we going to install New domain Controller in new forest please select the option "Create a new domain in new forest" option and click on "Next"

  • Now we have to provide the name for our domain controller. It must be FQDN. In our case I used rebeladmin.com as the domain. Please click "Next" after it.

  • In this window it will ask to select forest function level. If you going to add server 2003 domain controller to your forest later don't select the function level as server 2008. If you going to use full features of 2008 Ad you must select forest function level as server 2008. In my case I used server 2008. Click on "Next" after the select.

  • In next window since it's the first DC we should make it as DNS server too. Leave the default selection and click on "Next"

  • If the wizard cannot create a delegation for the DNS server, it displays a message to indicate that you can create the delegation manually. To continue, click "Yes"

  • In next window it will show up the database location. It its going to be bigger AD its good if you can keep NTDS database in different partition. Click on "Next" after changes.

  • In next window its asking to define a restore mode password. Its more important if you had to do a restore from backup in a server crash. Click on "Next" after filling it.

  • Next window is giving you a brief of the installation. Click on "Next"

  • Then it will start the installation of the AD. It will take some time to complete. After complete of the installation perform a server reboot.

  • After the reboot now you can login to the domain. Please use the login as following example
User name : your domain\administrator
Password : XXXXXXXX
  • Now its done and you can view the active directory options on administrative tools menu

Hope this tutorial is clear for you guys.

How can I enable multiple users login at a time in remote system


  1. Log into the server and open MMC.exe.
  2. File → Add/Remove Snap-in → Group Policy Object → Add → Finish → OK.
  3. Double click Local Computer Policy → double click Computer Configuration → Administrative Templates → Windows Components → Remote Desktop Services → Remote Desktop Session Host → Connections.
  4. Limit Number of Connections = 999999.
  5. Restrict Remote Desktop Services users to a single Remote Desktop Services session =DISABLED.


Enable Task Manager disabled by Administrator or Virus in Windows

Windows Task Manager is used to view details about processes running on your computer. Since it can be used to terminate programs that are misbehaving or are viruses disguised in the form of harmless programs, most spyware and viruses disable it to prevent themselves from being closed through it. Some administrators also disable Task Manager to prevent users from closing important security programs like antiviruses and anti-malwares.

In such situations, running the Task Manager will give the "Task Manager has been disabled by Administrator" error. However, there are some techniques you can use to re-enable task manager and close those harmful programs manually. This article contains few such simple techniques you can use to regain access to Task Managing privileges.

enable task manager disabled by administrator

Enable Task Manager from Registry in Windows 8, 7, XP or Vista

Registry Editor is an inbuilt Windows tool that is used to modify registry keys which tell Windows how it should work. A simple registry modification can be used to bypass the Task Manager block. To do so, just follow the steps:-
  1. Click on Start. Go to Run. If you use Windows 8, Windows 7 or Windows Vista, go to Search.
  2. Type regedit and press Enter. Registry Editor will start. If Registry Editor is also disabled, you will first need toenable registry editing.
  3. Through the left hand navigation pane, navigate to HKEY_CURRENT_USER\Software\Microsoft\ Windows\ Current Version\Policies\System. If the System key is not there, you will need to create it.
  4. In the work area, locate "DisableTaskMgr". If this value is not there, you will need to create a new DWORD value called DisableTaskMgr. Double click on it. A window will pop up.
  5. Enter its value data as 0 and press OK.
  6. Close Registry Editor. If Task Manager is still disabled, restart your computer.

Enable Task Manager from the Group Policy Editor (Gpedit.msc)

enable task manager
Windows Task Manager in Windows 7
Group Policy Editor is a feature in Windows which is used to edit local policy settings. It can also be used to enable Task Manager. To do so, just follow the steps given below:-
  1. Open Start Menu. Windows XP users click on Run. Windows 8.1, Windows 8, Windows 7 and Vista users, go to Search.
  2. Type gpedit.msc and press Enter. Group Policy Editor Window will show up.
  3. From the navigational pane at the left hand side, go to: User Configuration>Administrative Templates>System>Ctrl+Alt+Del Options.
  4. In the work area, double click on "Remove Task Manager" and set its value to Disabled or Not Configured.
  5. Restart your Computer or Log Off and Log back On to apply the changes.
Group Policy Editor is not available on home editions of Windows.

Enable Task Manager by Running a CMD Command

Command Prompt can also be used to directly enable Task Manager. 
  1. Open Notepad.
  2. Copy the code given below and paste it.
  3. REG add HKCU\Software\Microsoft\Windows\CurrentVersion\Policies\System  /v  DisableTaskMgr  /t REG_DWORD  /d /0 /f
  4. Save the File as TaskManager.bat.
  5. Run TaskManager.bat as Administrator if you use Windows 8, Windows 7 or Windows Vista. In Windows XP, simply open the file. A command prompt window will flash for a second and then disappear indicating successful execution. After running the batch file, you will be able to again use Task Manager. If Task Manager is still not available, restart your computer.

Create a Registry(.reg) file for enabling Task Manager

If you are unfamiliar with manually editing the Registry, you can create a Registry file which will automatically modify the Registry Key to re-enable Task Managing. To create one such file:-
  1. Open Notepad or any other text editor.
  2. Copy the code given below and paste it as it is in it.
  3. Windows Registry Editor Version 5.00 [HKEY_CURRENT_USER\Software\Microsoft\Windows\CurrentVersion\Policies\System] “DisableTaskMgr” =dword:00000000
  4. Save the file as Enable Task Manager.reg or *.reg.
  5. Open the file by double clicking on it.
  6. Registry Editor will ask you for confirmation. In the confirmation Window, click Yes.
  7. Task Manager would immediately be accessible. If it is not, restart your computer.

Thursday, 3 March 2016


Installing And Configuring Windows Deployment Services

 In this post we will see how to install and configure Windows Deployment Services. Windows Deployment Services is a technology from Microsoft for network-based installation of Windows operating systems. In windows server 2003 it was called as Remote Installation Services (RIS). The purpose of WDS is to remotely deploy the windows operating systems, Windows Deployment Services role in server 2008 R2 enables you to efficiently deploy Windows operating systems, particularly Windows 7, Windows Vista and Windows Server 2008 R2. Windows Deployment Services role can be used to set up new computers through a network-based installation without the IT Professional having to be physically present at each computer and without having to install directly from CD or DVD media.
Lab Setup – I have setup 2 virtual machines, the first virtual machine is installed with Windows Server 2008 R2 Enterprise SP1 OS and its our domain controller. The second virtual machine is installed with Windows Server 2008 R2 Enterprise SP1 OS and its our WDS server. The DHCP server role has been installed on the domain controller, this DHCP service will provide IP addresses to the other machines.
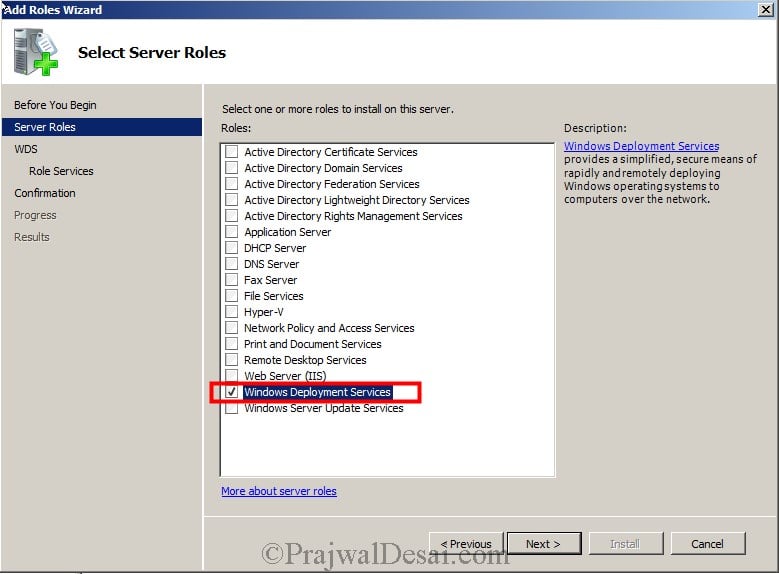
On the server where you are installing Windows Deployment Services role, launch the Server Manager, right click on Roles, click on Add Roles. On the Server Rolespage, select Windows Deployment Services. Click on Next.
Installing And Configuring Windows Deployment Services Snap 1
On the Role Services page, the Deployment Server and Transport Server roles are checked by default. Click on Next.
Installing And Configuring Windows Deployment Services Snap 2
Once the installation is complete click on close.
Installing And Configuring Windows Deployment Services Snap 3
If you are looking for command line installation of WDS server, then use the below command.
Open the powershell and run the command ServerManagerCmd -install WDS.
Installing And Configuring Windows Deployment Services Snap 4
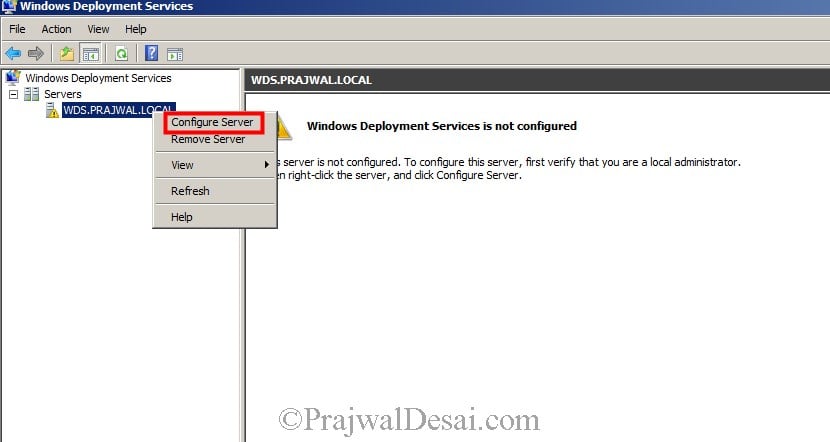
Click on Start, click on Administrative Tools, click on Windows Deployment Services. On the WDS console, expand Servers, right click on the WDS server and click on Configure Server.
Installing And Configuring Windows Deployment Services Snap 5
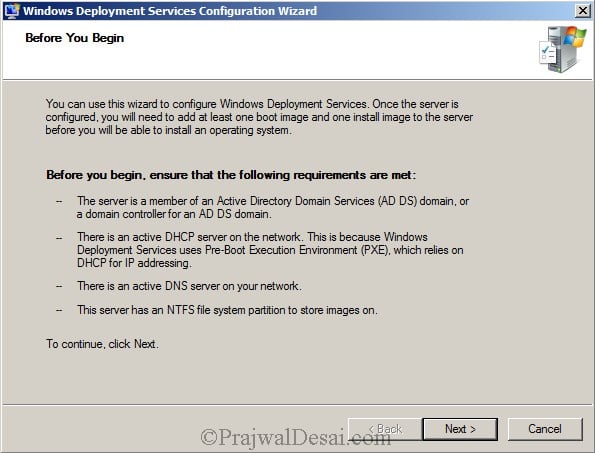
Read the requirements once before you click next.
Installing And Configuring Windows Deployment Services Snap 6
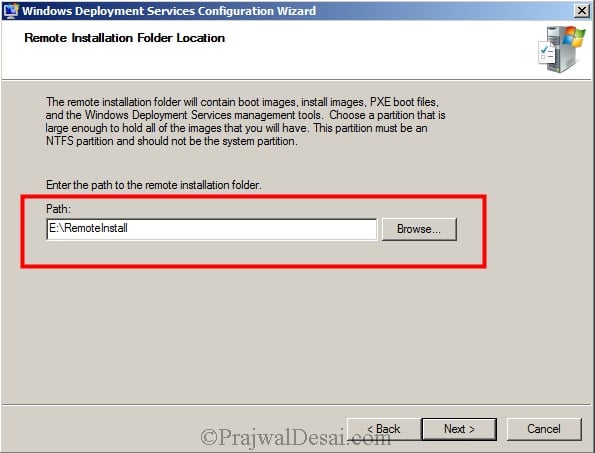
Choose the Remote Installation Folder location on other drive. The folder contains the boot images, install images, so make sure this drive has enough space to hold the data. Click on Next.
Installing And Configuring Windows Deployment Services Snap 7
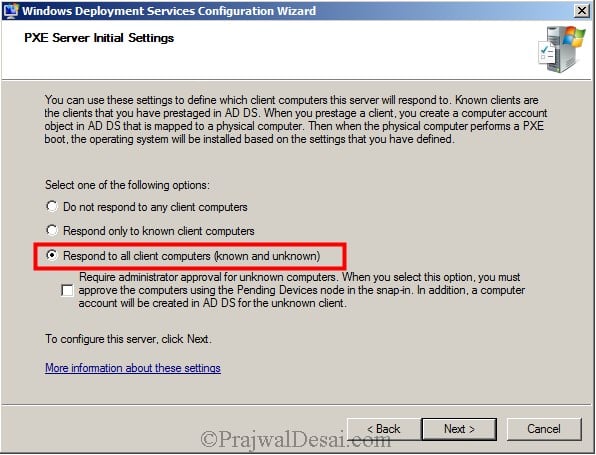
Select Respond to all client computers (known and unknown). Click on Next.
Installing And Configuring Windows Deployment Services Snap 8
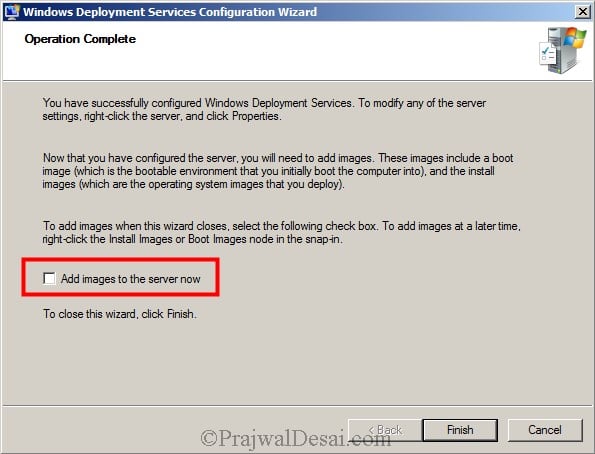
Uncheck the checkbox for Add images to the server now. We will add the images in the next step. Click Finish.
Installing And Configuring Windows Deployment Services Snap 9
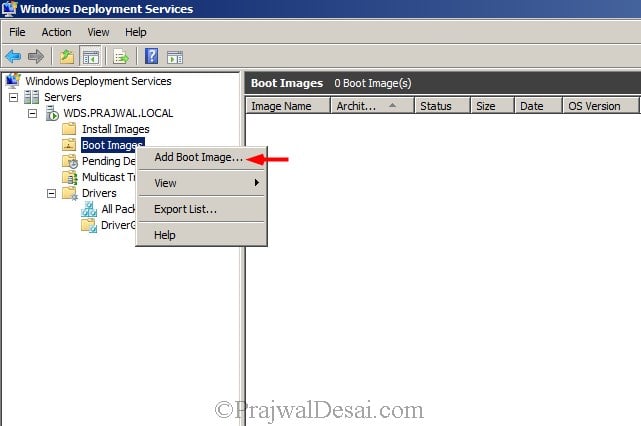
In this step we will add Boot Image and Install Image. Boot images are images that you boot a client computer into to perform an operating system installation. To add the boot image, right click Boot Images and click on Add Boot Image.
Installing And Configuring Windows Deployment Services Snap 10
Browse to the location where the operating system installation files are stored. In this example we will importing boot.wim from windows 7 professional SP1 64 bit DVD as boot image. The boot.wim file can be found under folder named Sources. Select boot.wim and click on Open.
Installing And Configuring Windows Deployment Services Snap 11
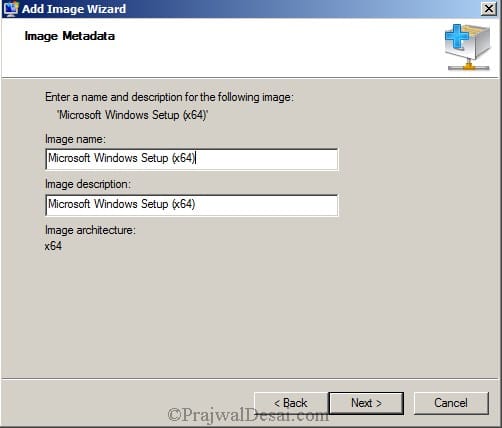
Enter the name for the boot image. Click on Next.
Installing And Configuring Windows Deployment Services Snap 12
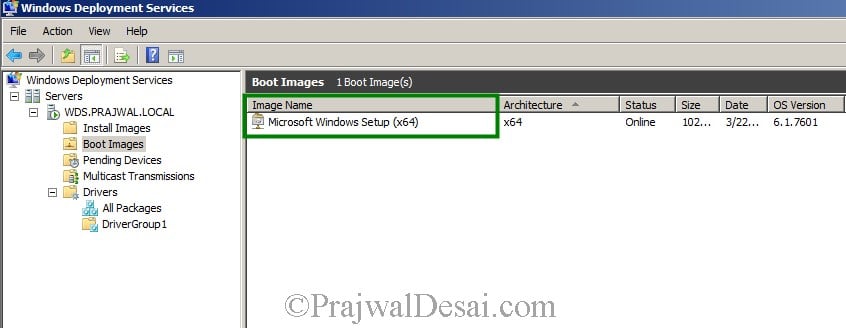
We have imported or added a boot image to our WDS server. Click on Finish.
Installing And Configuring Windows Deployment Services Snap 13
The boot image can be seen under Boot Images folder.
Installing And Configuring Windows Deployment Services Snap 14
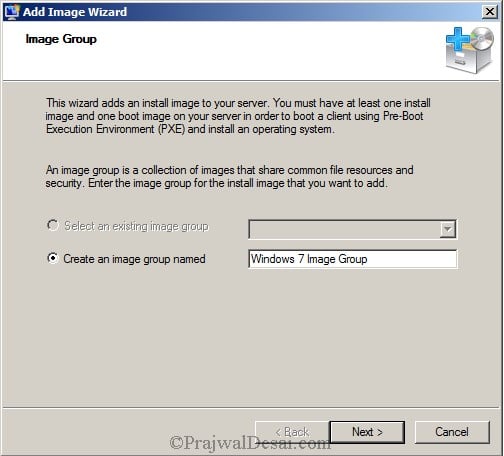
To add the Install image, right click Install Image, click on Add Install Image, provide a name and create a new Image Group. Click on Next.
Installing And Configuring Windows Deployment Services Snap 15
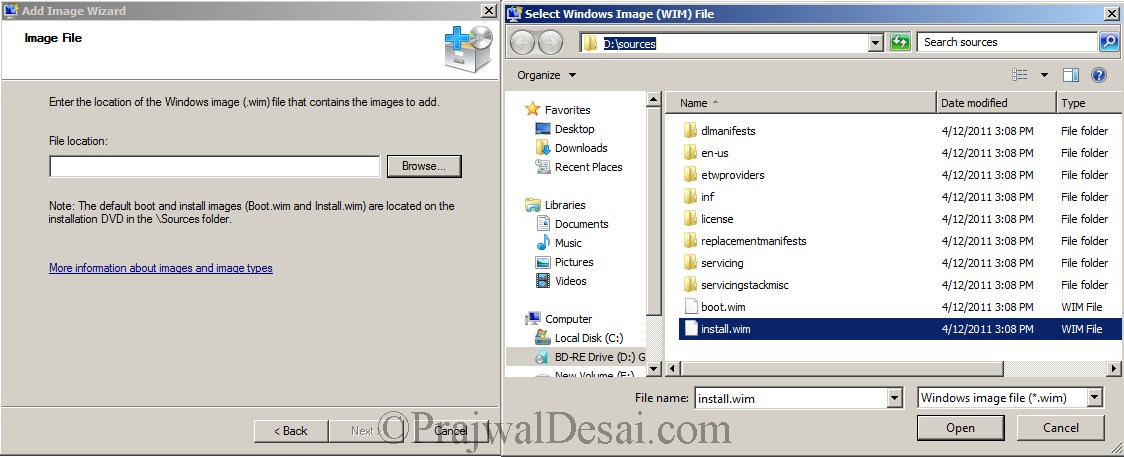
Now we have to select and add the Install image. Install images are the operating system images that you deploy to the client computer. Click on Browse and the select Install.wim. Click on Open.
Installing And Configuring Windows Deployment Services Snap 16
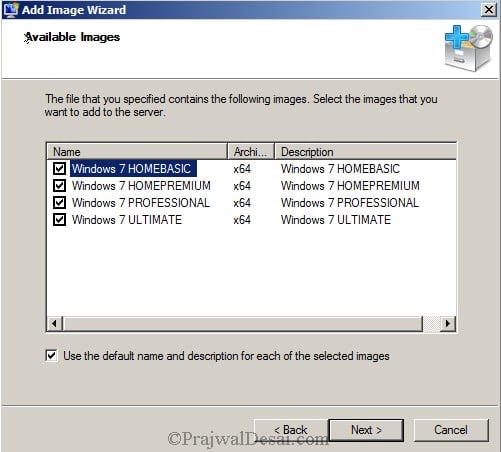
In the below screenshot we will select all the editions of windows 7 that are listed. click on Next.
Installing And Configuring Windows Deployment Services Snap 17
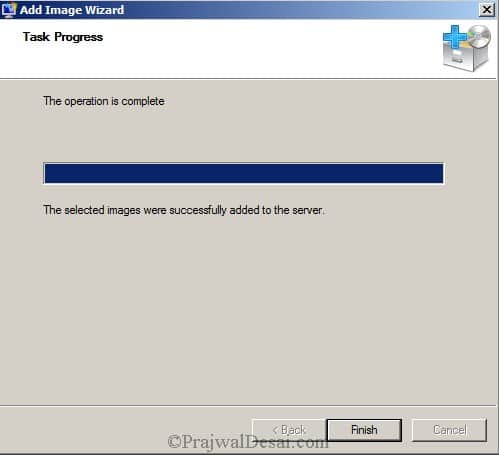
Click on Finish to close the Add Image Wizard.
Installing And Configuring Windows Deployment Services Snap 18
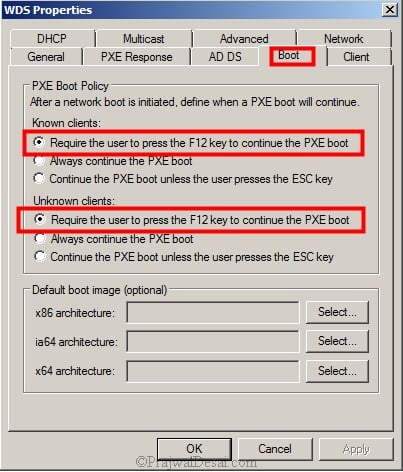
Lets configure the WDS server properties now. Launch the Windows Deployment Services Console, right click the WDS server and click on Properties. Click onBoot and make sure Require the user to press the F12 key to continue the PXE boot is selected for known and unknown clients.
Installing And Configuring Windows Deployment Services Snap 19
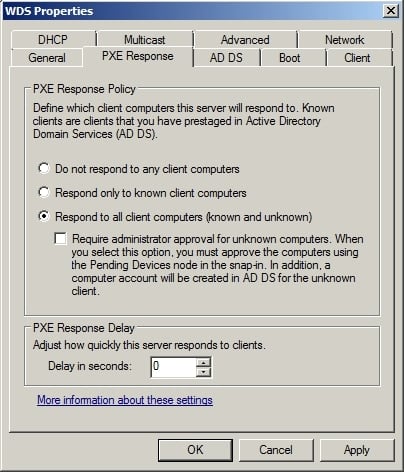
Click on PXE Response and make sure that Respond to all client computers (known and unknown) is selected. Click on Apply and Okay.
Installing And Configuring Windows Deployment Services Snap 20
In the next post we will look at steps to deploy an image using WDS and also to capture it.